The essential guide to Wi-Fi surveys: which one you need and how to prepare
What a Wi-Fi survey measures, which of the four surveys fits your site, the signal targets to set, and how to prepare: objectives, the building, interference and tools.


In this article
A Wi-Fi survey is a systematic assessment of the Wi-Fi in a defined space: how strong the signal is, where it reaches and what interferes with it. Good Wi-Fi takes more than access points on the ceiling; it takes an understanding of the building they go into, and a survey is how you get it. With nothing installed yet, you need a predictive or a site survey; with a network running, a verification survey or a health check.
What a Wi-Fi survey measures
Wi-Fi surveys measure three things across the site:
- Signal strength, in dBm: a negative number that gets closer to zero as the signal gets stronger, so -60 dBm is stronger than -75 dBm.
- Coverage: where the signal is usable, where it is weak and where the dead zones are. Finding them lets access points go where they give the most coverage and the strongest signal.
- Interference: anything else on the same frequencies, from neighbouring Wi-Fi to equipment that is not Wi-Fi at all.
Set against the background noise, signal strength gives the signal-to-noise ratio (SNR), in decibels. A device needs a signal that is clear as well as strong, which is why a scanner showing full bars in a noisy hall can still time out. Read together, the two show where settings need tuning to cut interference and maximise data throughput. The result is data your IT team or network administrator can act on, to optimise performance and resolve the connection problems people report.
When a survey is worth doing
- Before you buy. A new building, extension or fit-out. The survey sets how many access points you need and where, so you buy the right number once.
- When the building changes. New racking, a mezzanine, a cold store, a change in what is stored.
- When the devices change. A rollout of handheld scanners, touchscreen PCs or kiosks.
- When people complain. Scanners dropping along one aisle, full bars but timing out, trouble at certain times of day, or complaints clustered in one area.
Each time, the aim is a connection as reliable at the far end of the premises as beside the comms cabinet, which keeps employees productive and customers and visitors satisfied: a picker's scanner holding its session from goods-in to dispatch, a hotel guest connecting in a top-floor room. Finding the cause early costs less, too: it heads off costly downtime, and may show that a channel or configuration change will do instead of an infrastructure upgrade you did not need.
The honest exception: a small office with one or two access points and no complaints rarely needs a formal survey.
Which survey you need
There are two main types of on-site survey, and many surveys use both:
- Passive survey
- The survey device listens to the live network without joining it, in effect eavesdropping to see how it performs in real time. It hears every access point in range, yours and the neighbours', which makes it the tool for mapping coverage and overlapping channels.
- Active survey
- The device joins the network, so it needs the network's credentials, and generates test traffic, simulating your devices. It measures throughput, delay and lost packets, and whether connections hold while moving between access points: the test for "full signal, but it still times out". Where handhelds roam, this is the survey that shows the failure, though a laptop roams differently from a scanner, so test the real device too.
Which survey you book, and what to have ready, depends on where your network is now:
| Where you are | The survey | What to have ready |
|---|---|---|
| Nothing installed, or the building is still on drawings | Predictive survey: access points modelled on your plans | Scaled floor plans, with wall materials if known |
| A new installation in a hard building: racking, steel, stone | Site survey: a battery-powered access point tested at each proposed position | Floor plans, site access, the building in its normal working state |
| A newly installed network to prove against the design | Verification survey: the installed access points measured on site | Floor plans, and every access point working before the survey starts |
| An existing network people complain about | Health check: a verification survey plus a configuration review | As for verification, plus access to the access point settings and, if relevant, the client devices |
Between the first two rows, the deciding question is how well the building's materials are known. A prediction assigns a signal loss to each wall and obstacle, so it is only as good as those figures: dependable for plasterboard and glass, much less so for stocked racking, a cold store or thick stone, which is where measuring a real access point earns its cost. Whichever you choose, a verification survey after installation is what proves the design.
How to prepare for a Wi-Fi survey
Four steps make the findings accurate and easy to act on.
Set clear objectives, in numbers
Decide what the survey is for: better coverage across the whole network, finding and eliminating dead zones, or fixing particular areas people have complained about. Then put numbers on it. Where scanners or voice are used, a common design target is a signal of -67 dBm or stronger with an SNR of 25 dB or more; around -70 dBm is often enough for office data. A stricter figure from your device maker wins. For a warehouse running handhelds, a brief a surveyor can design to looks like this:
- Devices: the exact handheld model, since a scanner's small antenna hears the network differently from a survey laptop, plus any vehicle-mounted terminals and fixed kiosks.
- Target: -67 dBm and 25 dB SNR, with a second access point heard at a usable level, so a moving scanner always has somewhere to roam.
- Where: every aisle, goods-in, dispatch and the chiller, at scanner height and at the top pick level of the order pickers.
- When: during a working shift, with the racking stocked as it runs at peak.
Software providers deploying into a customer's site should supply the device list themselves. Fixed devices need a different question from roaming ones: the signal at each exact mounting point. That is how we position CabinetPro's stainless steel touchscreen PCs and kiosks, in sites from food factories to steel foundries.
Understand the building
The building decides how far the signal travels. Note the layout and structure (walls, partitions and other obstacles), the materials (concrete, glass and metal all attenuate, or weaken, Wi-Fi), the size of the area, and whether it is indoor, outdoor or on several levels, since size and type of space both change the logistics and equipment. Each kind of site adds its own details:
| Site | What to note |
|---|---|
| Warehouse with high-bay racking | Rack heights, what is stored and how full it runs. Stocked racking blocks far more signal than empty, so a survey of an empty floor overstates coverage. |
| Food factory | Stainless washdown areas reflect signal and water-heavy product absorbs it. Chillers and freezers of steel-faced insulated panels behave almost like a sealed metal box and usually need an access point inside, often in an IP-rated enclosure. |
| Steel foundry | Heavy steel structure, overhead cranes moving metal through the signal's path, and the heat and dust that limit where equipment can go. |
| School | How many devices each classroom uses at once, as capacity matters as much as coverage; separate blocks and outdoor areas. |
| Listed building | Thick stone or solid brick walls, deep window reveals, and limits on fixings and cable routes, which decide where an access point is allowed to go as well as where it would work. |
| Office block | Glass partitions, coated energy-efficient glazing (far worse for signal than plain glass), lift shafts and stair cores. |
Look for sources of interference
Wi-Fi shares its frequencies with other equipment. A walk round first lets you anticipate problems and plan how to handle them during the survey. Note what transmits, where, and when:
- Microwave ovens leak into the 2.4 GHz band while running, so the canteen may only cause trouble at break times.
- Cordless phones. Most in the UK are DECT, on 1.9 GHz and clear of Wi-Fi; older or non-DECT 2.4 GHz models are the ones to find.
- Neighbouring Wi-Fi networks on the same or overlapping channels. The UK allows 2.4 GHz channels 1 to 13, but only 1, 6 and 11 do not overlap, so every 2.4 GHz network nearby is competing for those three.
- Bluetooth devices, such as headsets and ring scanners.
- Wireless security cameras on their own radio links rather than Wi-Fi.
- Your own access points. Two on the same channel that hear each other must take turns (co-channel interference); two on overlapping channels garble each other's traffic (adjacent-channel interference). A health check looks for both.
We add spectrum analysis of the Wi-Fi bands to every on-site survey. A Wi-Fi adapter decodes only Wi-Fi, so everything else looks like noise to it; the analyser shows what that noise actually is.
Choose the right tools
Whether you take a first look yourself or are judging a contractor's kit, match the tools to the scope and complexity of the job:
- Basic: a Wi-Fi-enabled phone or tablet running a survey app, for a quick look at a small area. It shows what one phone hears where you stand and cannot see non-Wi-Fi interference: it tells you there is a problem, not its cause.
- Advanced: dedicated survey hardware and software platforms, for anything you will buy access points or sign off a design on.
Judge either on survey accuracy (one adapter throughout, held at your devices' working height), real-time visualisation of the data (a gap is re-measured on the day, not found in the report) and compatibility with your existing network infrastructure (every band you use, 6 GHz included if Wi-Fi 6E is planned, and your network's security for an active survey).
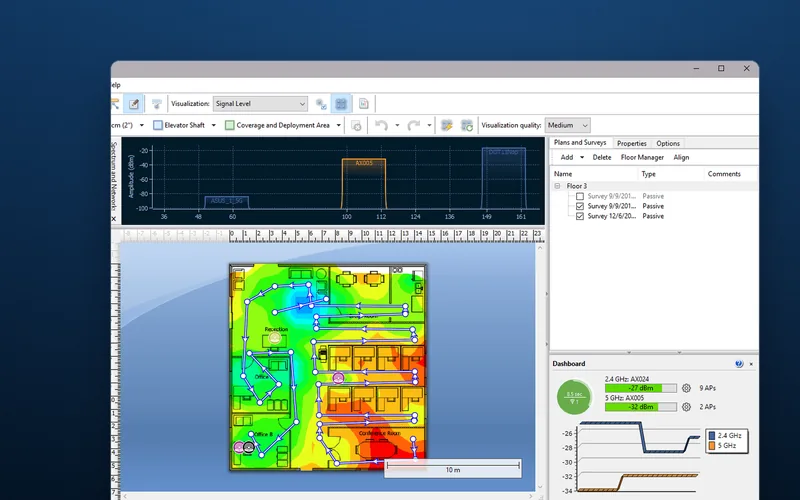
Our on-site surveys use heat-mapping software on a laptop, measuring at regular intervals across your floor plans; in a high-bay warehouse, the battery-powered test access point goes up on a lift to the real mounting height.

What you get back, and how to check it
A survey from DW WiFi ends in documents you can act on: for a site survey, a bespoke report on the proposed solution with photographs of each proposed access point location, and a heat-map report of signal levels and coverage; a health check adds the tests carried out, the issues found and recommendations. Together they are the roadmap to better connectivity: they show precisely where the network is strong and where it is weak, so eradicating a dead zone, mitigating interference or expanding coverage is decided on measurements, not hunches.
Before you accept any survey report, ours included, check that:
- the coverage maps use your figure, such as -67 dBm, not a looser default, and every area in the objective meets it;
- it names the device that took the measurements, and the height it was held at;
- it was done with the site working: stock in, machines running;
- every shortfall has a cause and a fix, whether a setting, a moved access point or an extra one.
To start, send your enquiry with the brief above: your objectives and target figures, the device models that must work, scaled floor plans, and your notes on the building and what else transmits there.